How To: Doll Wig Cap and Hair Wefts From Scratch
Wig Cap:
Only a few supplies are needed for creating a doll wig cap and are usually items that an avid crafter already has lying around the house. Those items include:
- Mod Podge
- Plastic Wrap
- Paintbrush
- Rubber Bands
- Scissors
- Scrap Fabric with some stretch

This technique can be applied to any size doll head but I've found that the larger the head, the better the results. The first step is to wrap the doll's head with plastic wrap for protection.

Next, cover the head with the stretchy fabric (i.e. old t-shirt). Smooth down and secure in place with rubber bands. Use as many rubber bands as it takes to eliminate wrinkles in the fabric. The rubber bands will create a faux hairline.

Apply 3-4 coats of Mod Podge within the cap area. Wait a few minutes before applying the next coat so that each coat can create a thin layer. After application is finished, let dry completely.

When completely dry, remove the rubber bands and trim the cap following the hairline. This cap is now ready to have hair applied!

Hair Wefts:
The following instructions detail how to make hair wefts using yarn. The supplies needed include:
- Mod Podge
- Parchment Paper
- 100% Acrylic Yarn
- Flat Iron
- Paintbrush
- Wooden Dowel
- Pointed Tool (i.e. needle, awl, piercing/scoring tool)
- Scissors
- Comb

The first step is to cut three equal lengths of yarn and loop it into a knot around the wooden dowel. The wooden dowel can be substituted for another piece of yarn or anything else suitable. However, I found the wooden dowel to be very stable and it is easy to remove the yarn later on in the process.
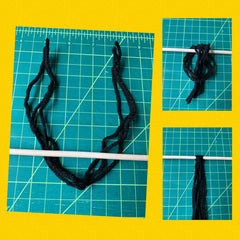
Next, manually unravel each strand of yarn using a pointed tool as help. I've seen other crafters use a pet brush to comb out the yarn. However, that method did not work for me. It was a total disaster! I kept just brushing the yarn away into nothingness. I don't have the magic pet brush technique down so I found this method to work for me.

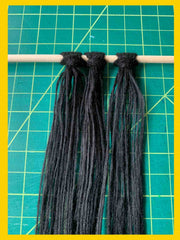
When each strand is fully unravelled, lightly comb it out. Then press over each weft a few times on the lowest possible setting of the flat iron. The lowest setting on my flat iron was 310 degrees Fahrenheit.
On a piece of parchment paper, lay down a generously applied strip of Mod Podge.

Transfer the pressed yarn from the wooden dowel to the Mod Podge strip. Apply another coat of Mod Podge on top of the top edge of the yarn to make sure that it is fully enveloped in adhesive. Let dry completely.

When it is completely dry, peel the strip off of the parchment paper. Trim the top edge of the strip so that it is neat and even. Then cut and separate into wefts of varying widths that fit your project.

The next phase is applying the hair wefts to the wig cap...


2 comments
Did not work for me
I need advice on combing out the yarn! Wether I use a pet comb or pick it apart, it always breaks apart. I’d love instructions on that part specifically, it’s the only part i can’t get down!