Making Miniature Felt Hats Using Plastic Doll Hats as Molds
We are a few days into Autumn and I am feeling the pumpkin spice latte vibes. I am in the mood to make a cozy head-to-toe Autumn-inspired look for my mini-me Barbie doll but I need to create most of the pieces. The first piece being a trendy felt hat--- Floppy or Fedora. In the past, I've used a technique to create a straw-like hat using, Mod Podge, burlap fabric, and plastic Barbie hats as molds.

Now, I want to use the exact same technique except substituting burlap with felt. The supplies are:
- Felt Sheets
- Plastic Doll Hats
- Rubber Bands
- Sewing Pins
- Mod Podge and Paintbrush
- Styrofoam Block (optional)

The process is as follows:
- Soak the material in water until it is fully saturated.
- Squeeze out the excess water but make sure that the fabric is still wet.
- Cover the plastic doll hat with the material and secure the crown with rubber bands.
- Trim excess fabric but leave an extra amount beyond the brim.
- Pin the rubber bands in place because they might roll off otherwise. This can also be simultaneously pinned to a styrofoam block for stablization.
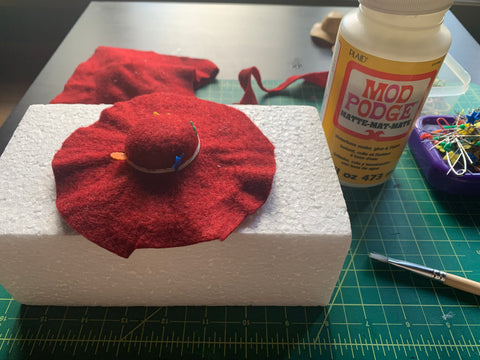
- Use the paintbrush to apply watered-down Mod Podge to the entire damp hat in thin layers. A few thin layers should suffice. *UPDATED*
- Smooth fabric flat against the mold and pin the brim down into the styrofoam block. Or create ripples in the fabric to simulate a floppy effect.
- Let air dry approximately 24 hours or overnight.
- When completely dry, trim brim evenly as desired, remove pins and rubber bands, peel off of mold.
- Project complete!

At the moment, my first attempt is drying. I will check it tomorrow and follow the remaining steps. If it comes out well, I will decorate it with a ribbon band and maybe some embellishments. Then I will make a few more hats in different styles and colors and continue putting together my miniature Autumn look.
Issues that I am anticipating:
- Will the glue dry clear or look white and gloopy?
- If so, is there a solution, like sanding?
- Will it dry stiff enough to retain its shape?
Hopefully all goes well. Fingers crossed!
*UPDATE* 09.27.22
The first round was a success!

The felt was more difficult to peel off of the mold than the burlap but still not too bad. There is a noticeable white residue from the Mod Podge remaining on the felt so my next step is to experiment with cleaning up the final product and decorating. I am also going to make a few more hats in different colors. Will report back my findings when I finish. Stay Tuned...
*UPDATE* 09.29.22
So this "simple" project has taken an unexpectedly long time--- mostly due to drying time. I was unsatisfied with the first completed hat because it is difficult to efficiently remove the white residue once it's dry.
I conducted a couple more trials and found that the Mod Podge needs to be watered down and periodically smoothed out on the felt while it is drying (steps updated above). This significantly reduced the amount of white flaking. I also applied the Mod Podge to the flat piece of felt first. Then formed it to the plastic mold with the glue side down. That way, if there was any white reside, then most of it would be on the underside. This actually worked very well.

The best results came from the larger-brimmed hats and especially the floppy hats.

The shorter-brimmed hats had terrible results all around.

The best hat molds had wider brims because they helped the felt retain its shape while drying.

I am very pleased with this project overall. My conclusion is that this project could work very well for personal means but it is probably not a great product to sell. The burlap fabric definitely worked better with this technique. I still need to clean the felt up some more, add a ribbon band, and take nice pictures but that is an Instagram post for another day!

Well what did you think? Did you try this project or are you going to? Any questions or helpful tips? Leave Your Thoughts Below!


3 comments
Thanks so much for your tutorial. As for the felt staining how about using a magic marker or paint pin to cover it? Just a thought. Great job
Hi Cindy! Thanks for your comment! I actually bought a product called Kahl Hat Stiffener and tried to used it for this project. The instructions suggested a fine mist so that’s probably why it did not work for my purposes. I’m sure that I will make more hats in the future so I can’t wait to try your suggestion. Thanks again :)
I have made a few of these myself over the years and I found a product called Stiffy which is a fabric stiffener. It’s sold at craft stores and it dries clear . I soak my felt in it full strength, using a shallow bowl, then squeeze it out and mold exactly as you show here